How to Remove Shine from Portraits
You've just started portrait photography and are beginning to enjoy discovering the different facets of this art. However, one day, following a photo session, you discover a peculiarity in many photos... Indeed, your subject's skin is shining brightly without meaning to!
Shine can quickly ruin the efforts made by the photographer to achieve the perfect portrait. Numerous white lines and points run across your model's face, diverting attention from their essential characteristics.
Where Does This Shine Come From, and Can It Be Removed?
Also called shine in English, this brilliance can come from several factors: heat, perspiration, poor lighting of the model, etc. Generally, it's quite easy to avoid this shine during the photo session by doing some makeup touch-ups, wiping the model's face, or simply modifying the lighting.
Prevention Tips During Shooting
- Makeup preparation: Use mattifying powder or primer before the session
- Blotting papers: Keep oil-absorbing sheets handy for quick touch-ups
- Lighting adjustment: Use softer, more diffused lighting to minimize harsh reflections
- Room temperature: Keep the shooting environment cool and comfortable
- Regular breaks: Allow time for the model to refresh between shots
It must be said that it's not always obvious to take all these factors into account when you're starting out. However, don't panic! It's possible to easily get rid of this phenomenon in post-production with Photoshop.
There are a multitude of tutorials on the web for removing shine, but none really satisfied me until I came across the method I'm going to explain to you now.
Photoshop and Content-Aware Fill to the Rescue
The Content-Aware Fill feature in Photoshop is a powerful tool that can intelligently analyze surrounding pixels and fill selected areas with appropriate content. When used with the right blend mode, it becomes an excellent solution for shine removal.
Why This Method Works
By using Content-Aware Fill with Darken blend mode at 75% opacity, we're telling Photoshop to analyze the surrounding skin tones and create a fill that only affects the lighter (shiny) areas, preserving the natural skin texture and tone.
Step-by-Step Photoshop Tutorial
- In Photoshop, open the image where you want to remove the shine.
- Double-click on the "Background" layer in the Layers panel to transform your image into a Layer ("Layer 1" by default).
- Click on the "Magnetic Lasso Tool" (or Polygonal Lasso Tool) and make a selection around a portion of the face where shine is present.
- Click on "Edit" → "Fill" (or Shift + F5).
- In the dialog box, choose "Content-Aware", set the opacity to 75% and select "Darken" blend mode.
- Click OK.
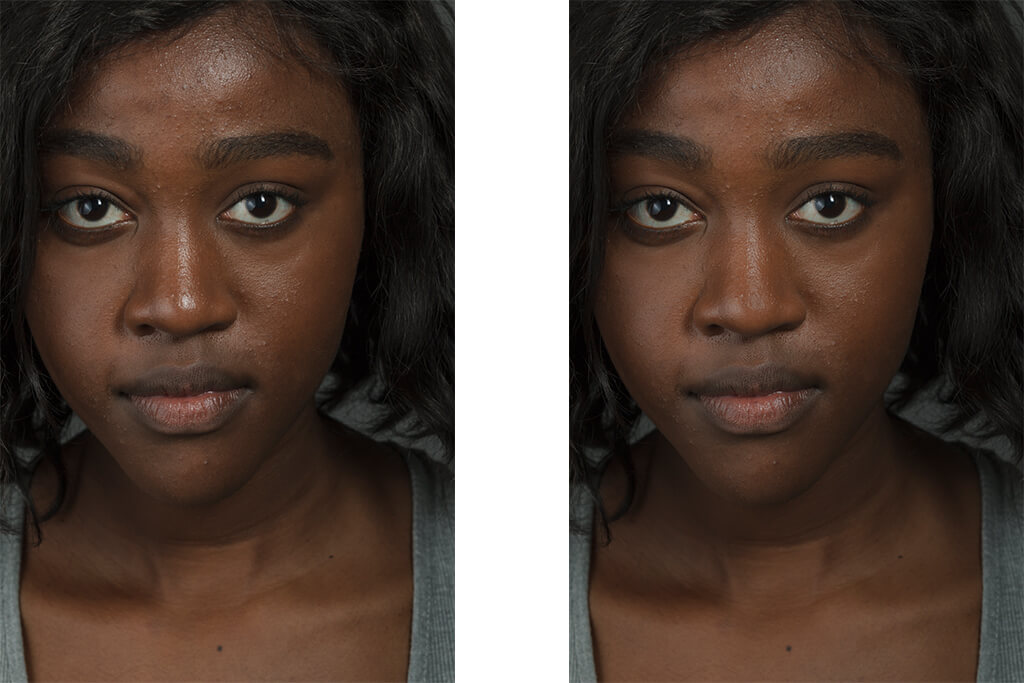
- And there you have it—the piece of skin that was shining is no longer shiny. You just need to repeat the operation as many times as necessary to remove the shine from the entire face.
Magical, isn't it?
Professional Tips for Better Results
While this method is highly effective, here are some additional tips to achieve even better results:
Advanced Techniques
- Work in small sections: Make smaller selections for more precise control
- Vary the opacity: Some areas might need 60% or 85% opacity depending on the severity of shine
- Use feathered selections: Add a 2-3 pixel feather to your lasso selections for smoother blending
- Check your work: Zoom out periodically to ensure the skin looks natural overall
When to Use This Technique
This Content-Aware Fill method works best for:
- Moderate to heavy skin shine on foreheads, noses, and cheeks
- Portraits with good overall exposure and detail
- Images where the shiny areas have enough surrounding skin tone reference
- Professional headshots and beauty photography
For very subtle shine or when working with high-end beauty retouching, you might also consider frequency separation techniques or dodge and burn methods, but for most portrait work, this Content-Aware Fill approach provides excellent results with minimal effort.
"The goal of portrait retouching should always be to enhance the subject's natural beauty while maintaining authenticity. Removing distracting shine allows the viewer to focus on the person's character and expression."
This technique has saved countless portrait sessions and helped me deliver professional results even when shooting conditions weren't ideal. Remember, the best approach is always prevention during the shoot, but when that's not possible, Photoshop's Content-Aware Fill provides an excellent solution for creating polished, professional portraits.
As you practice this technique, you'll develop an intuitive sense for selection size, opacity settings, and when to apply this method versus other retouching approaches. The key is to work subtly and preserve the natural character of your subject's skin while eliminating distracting shine.
Follow My Journey
Let's stay in touch — I'll share stories from my latest shoots, upcoming projects, and the little adventures that shape my photography. As a subscriber, you'll also get early access to special offers and exclusive content I don't share anywhere else.